by Barb Binder, Adobe Certified Instructor on Illustrator
Are you looking for the Crop tool in Illustrator? Good luck with that—as of CC 2015, there is still no Crop tool. I’m not saying you can’t crop your artwork or photo, I’m just saying you’re looking for the wrong tool. Illustrator handles cropping via a mask, and once you understand how it works, it’s easy.
Note: If you are looking for instructions on masking your final illustration, see Adobe Illustrator: How to Crop Final Artwork. This post deals specifically with masking a photograph within a project.
To crop a photo in Illustrator:
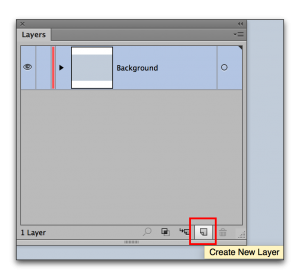
- Create a new layer for the photo by clicking Create New Layer button at the bottom of the Layers panel.
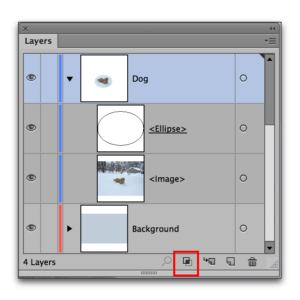
- I renamed my layer “Dog”.
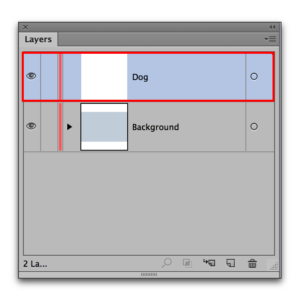
- With the new layer active (as indicated by the light blue in my Layers panel), use File > Place to add the photograph to your Illustrator file. Click to place it on the artboard. Use the Selection tool to size and position the photo.
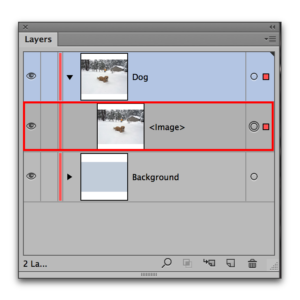
- On the new layer, draw your mask shape. (I used an ellipse.) Pay attention to the position of the masking object in the Layers panel: it needs to be positioned directly above the photo, and directly below the new layer.
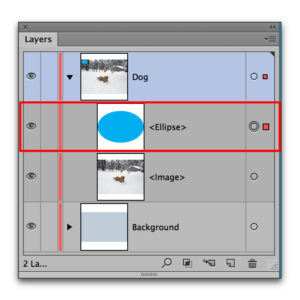
- To complete the mask, select the new layer (located directly above your mask shape), and click the Create/Release Clipping Mask button at the bottom of the Layers panel.
- Finish up the rest of the artwork, and you are all set!

Want more masking options? See Adobe Illustrator: Clipping Masks.
NOTE: In my experience, there are two primary reasons why this doesn’t work:
- The mask shape is not in the right place. (See step 4 above.)
- The top-level layer isn’t active prior to clicking the Make/Release Clipping Mask button. (See step 5 above.)