by Barb Binder, Adobe Certified Instructor on Adobe InDesign
Updated Jan 29. 2024
InDesign has a robust set of numbering tools, but most users don’t do much more than set up basic numbered lists. Yesterday, in my Advanced Adobe InDesign class, a student asked how to number her chapters, subheads, tables and figures. It can be done, but isn’t covered in our workbook.
Note: This post explains how to handle the numbering when working with chapters in a book file. If you are working with headings within a single file, please see “Numbering Headings in an InDesign Document” at the bottom of this post.
Numbering Headings in an InDesign Book
The goal was to number the text to look like the screen shot shown below, and to automatically update the numbers during edits.

The trick is to look at the numbers as columns. I’ll sketch them on paper out for complex situations. Here’s how numbering properties look for each of these paragraph styles:

1. Define a new list
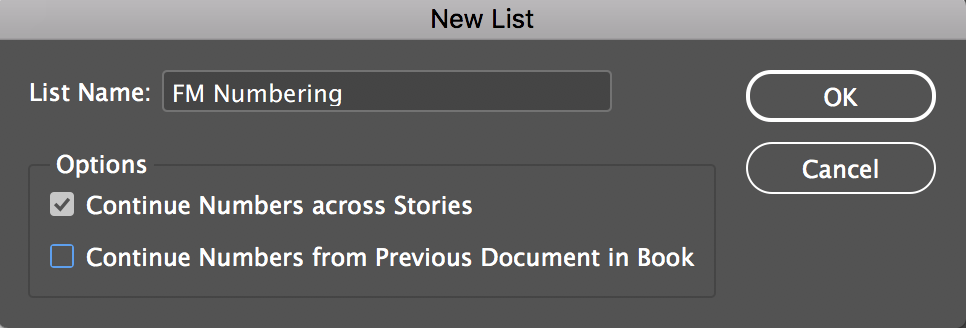
All of this happens in the Bullets & Numbering dialog box, shown below. You will definitely want to use paragraph styles for this. My first one is called Chapter title. You will need to begin by changing the List Type to Numbers for all of the levels, and you must both name the List and use the same named list for all Levels. You do this by selecting the List > New List.
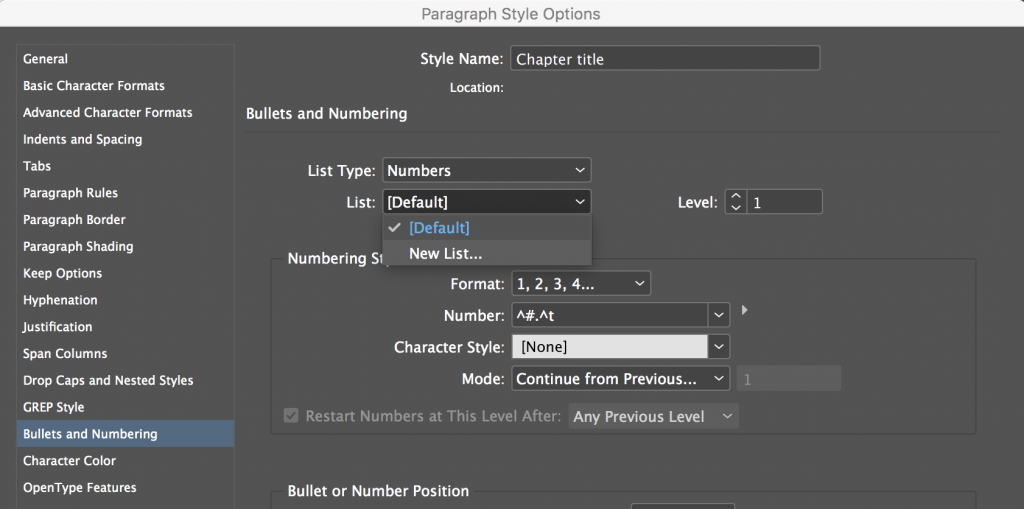
Type in a List Name. If you are going to be working with separate chapters in a book, uncheck Continue Numbers from Previous Document in Book. Click OK. (Note: you can update this dialog box after you have created your list via Type > Bullets & Numbering > Define Lists > [Your list name] > Edit.)
2. Set up the Chapter title numbering
Let’s start with the settings for the Chapter title style. Note the list name (FM Numbering), the level (1), the format (1, 2, 3, 4…), the all-important numbering style (Chapter ^H: ), the mode (continue from previous number) and restart numbers at this level is on (and can’t be turned off for level 1).

Chapter title is the first level of numbering in this document, and “Chapter ^H: ” tells InDesign to type “Chapter 1: ” in front of the chapter title in the first chapter, “Chapter 2: ” in the second chapter, and so on.
3. Set up Subhead 1 numbering
Let’s move on to the Subhead 1 style. Note the same list name (FM Numbering), the level designation (now it’s a 2), the number (^H.^2.^t) and that restart numbers at this level is on after any previous level.

Subhead 1 is the second level of numbering in this document, and “^H.^2.^t” tells InDesign to type the chapter number (^H), a period (.), the subhead number (^2) and a tab (^t) in front of the each Subhead 1, “1.1, 1.2, 1.3”. When set up as shown, the ^2 numbers will increment automatically.
4. Set up Subhead 2 numbering
On to Subhead 2. This one looks exactly like the settings for Subhead 1, but the level is now 3, and the number style “^H.^2.^3^t” is now calling in the level 3 number, i.e., “1.1.1, 1.1.2, 1.1.3, etc.”

5. Set up table and figure numbering
You may already be done, but my student also need table and figure numbering. In her document, the tables and figures only appear after Subhead 2s, so the formatting needs to look like this for her Table titles:

and this for the Figure titles:

Note that the list name remains the same for all of these tags. Table titles have a level 4 designation, and Figure titles have a level 5. The numbering style calls out the level 4 numbers (^4) on the Table titles, and the level 5 numbers (^5) for the Figure titles. It’s important to note that for this style, both of these restart after the level 3s (Subhead 2s).
6. Wrapping it up
In summary, paragraph numbering is really just an exercise in logic, and this blog post is showing the numbering styles for a very specific project. Your project may be similar, but not exactly the same. You just need to think though the levels and how you want to restart the numbers. I do my best to think it through correctly the first time, set it up, and then try as hard as I can to break it, so that I can find my errors. The good news is that once you get your numbers working, you shouldn’t ever have to think about it again.
Addendum
If you are working in with chapters in an InDesign book file, and the second and subsequent chapters don’t reset the Subhead 1 and Subhead 2 numbers, return to those chapters and choose Type > Bullets & Numbering > Define Lists > [Your list name] > Edit and uncheck Continue Numbers from Previous Document in Book.
Numbering Headings in a Single InDesign Document
The above instructions explain how to set up numbering in a multi-chapter InDesign book. If you prefer to lay out a multi-chapter document in a single InDesign file, you will need to make two changes to the Chapter Title tag:
-
- Substitute ^1 for ^H in the first column
- Change to Mode to Continue from Previous Number

I think it is important to mention additional possibilities for numbers and lists:
Inline Title: You can use the list type ”Numbers” to set up a paragraph without a number in the format and write any text. This text will appear at the beginning of any paragraph where this paragraph style is used. Only line breaks and hyphenation will not be possible with this ”Number Text”.
Tags for EPUB and HTML: Any list paragraph will be exported as list entry upon export as EPUB or HTML. Numbers become ol tags, bullets become ul tags. I would recommend to set up the export tagging as ”[Automatic]” and specify a CSS tag. Include it once in the CSS output.
Willi Adelberger, Munich, Germany
Two great ideas, Will. Thank you for your contribution.
~Barb
Thank you VERY, VERY MUCH!
What a well written and thorough tutorial. I really got to grips with the way numbering works from this. Thanks very much.
Thanks for the head start on this, it got me part the way through my problem but I found that when I had 3 figures in a row then a map, the next figure would jump back to #.1 again. Because I had figures, maps and tables that needed to be numbered I used the ‘levels’ to differentiate between them as you suggested, but found if you create a new number list for each entry ie. number list for maps, and number list for tables etc then they don’t conflict. thanks for the start off though. no where else pointed it out as clearly as this. Cheers
Thank you, thank you, thank you!
I successfully defined new paragraph styles, with the numbering, and am using them for both “Section” and “Chapter” titles in my novel. I even made “non-numbered” versions, which can co-exist in the same TOC.
I defined the style numbering as “Chapter ^2” at level 2. Then I added a full-stop (period) as the paragraph’s ‘text’, since the TOC will not include a paragraph which reads “Chapter 1” unless there’s also ‘text’ after the ‘numbering’. Similarly for “Section 1”, followed by a full-stop as the “paragraph content”.
I can see how I could actually name chapters and sections, such as “Section 1. Introduction”, in which the “Section 1” would be the numbered part, and “. Introduction” would be the section heading.
Next, I want to put the “Chapter ” into the page header on the recto Master page. (I do not need the “Section ” since I intend that chapter numbers increment across section boundaries. On the verso Master page will be the book title.
Using the Paragraph Styles as laid out above using the ^H as shown — is causing all chapters to remain at “1” in my document. They don’t change from one chapter to the next. Also the sub-chapters the first digit also remains a “1”. 1.1, 1.2, – It does not show 2.1, 2.1.1, etc.
Then you have to update the chapter numbers from the book panel menu.
~Barb