Need training at your office? Request a quote for custom training.
Adobe FrameMaker: Need Repeating Heading Rows?
By Barb Binder, Adobe Certified Instructor
Updated Oct. 23, 2022
Note: This process was greatly simplified in the Fall 2022 release of FrameMaker. If you are on 2022 (v17) or later, you see the 2-step process here: https://www.rockymountaintraining.com/adobe-framemaker-quickly-converting-body-rows-to-header-rows/
When I import tables into FrameMaker, they usually look as if they have a heading row, but the row doesn’t repeat when the table flows onto a 2nd or 3rd page. This is because my authors like to pre-format their tables, and part of that is making the top row look different from the body rows. Giving the top row a unique look does not a heading row make! Here’s how you convert the top row (or rows) to real heading rows:
To establish the top row(s) as repeating header rows, use these steps:
- Select the row(s) (Esc thr)
- Edit > Cut (Ctrl+X)
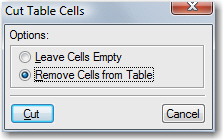
- Choose “Remove Cells from Table”, and click Cut

Cut Table Cells - Click an insertion point back into the table
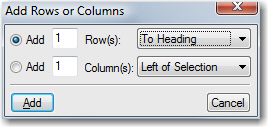
- Table > Add Rows or Columns (Esc ta)

Add rows or Columns - Choose Add X Row(s) “To Heading”
- Click Add.
- Select the new heading row(s)
- Edit > Paste (Ctrl+V)
- Choose “Replace Current Rows”

Paste Rows - Choose Paste
There they are!
Related Posts
Adobe FrameMaker: Quickly Converting Body Rows to Header Rows


Thanks! This was driving me nuts.
Great to hear!
~barb
Really helpful !!!! Thanks for posting this… 🙂
Perfect solution. Thank you!
Thank you! I looked in the help and asked coworkers to no avail, but this kept me from going crazy.
OMG life-saver 🙂
Thank you so much!!!!!!!!!!
thank you so much for this tip!
Thank you! You’re wonderful! 😀 This was also driving me quite insane.
Just adding my “thanks” to the chorus! 🙂
THANK YOU! I did NOT want to rebuild this complex table just to add a repeating heading row.
THANK YOU SO MUCH… I lost a lot of time looking in the Adobe documentation for this simple thing.
Just what I was looking for. I copied a bunch of tables from Word a couple of months ago and when I checked today, I realized the headings did not repeat on the succeeding pages. Thanks for sharing this!
Barb, the training you gave our company was great, and it also is great to come back to this site to refresh your memory and get tips! Thanks again!
Just tried it, thanks.
But the following can also be used, no need for cut and paste etc.
To create a table header row in an Adobe FrameMaker source document
1. In your Adobe FrameMaker source document, locate the table for which you want to create a table header row.
2. Insert your cursor in the top row of the table.
3. On the Table menu, click Add Rows or Columns.
4. Click Add 1 Row.
5. Select To Heading from the list.
6. Click Add. Adobe FrameMaker inserts a header row into the table.
7. Type the text for the header row into the table.
8. Delete any existing rows in the text that contain the text you typed into the new table header row as needed.
Thanks for the tip!
It’s not a method I would chose, simply because I have learned the hard way that retyping anything can introduce typos into text that is already been proofed and in final form, and because it takes me longer to retype than to cut/paste, especially for tables with multiple header rows, but it certainly works.
~Barb
I have the opposite problem. I need to edit the header of an existing table to read differently on different pages. Is this possible without splitting tables? Is there an easy way to split tables. I’m using unstructured framemaker 11.
Thanks
Sure. You can cut and paste the heading row cells back into the body rows, and then use a row break to force a row to the top of the next page. Note that this is manual, if you edit the table, you will likely have to move the rows around and re-break them.
To force a row to the top of the next page use Table > Format > Row Format > Start Row = Top of Page.
THANK YOU for a simple, eloquent, perfectly described solution!!!
Thank you for this very helpful info!
AWESOME!!!! I knew you’d have the answer listed on your site!!!! Thank you!
Screwy, but it works – “logic” says you could highlight the row and choose “To Heading” without adding or deleting… Still, it’s better than MS Word.
There they are, indeed!!! 🙂 Thank you!