By Barb Binder, Adobe Certified Instructor on FrameMaker
Updated: May 26, 2020
Once upon a time, the vision for FrameMaker was to be one of those 3-in-1 programs that were popular back in the ‘80s (remember Lotus 1-2-3?). The three components were word processing, illustration and page layout. Fast forward 30 years and FrameMaker is not the first program you are going to consider for simple word processing or complex illustration.
It has, of course, emerged as the program of choice for technical writers who need to produce very complex, technical documentation. However, the early features still remain in the software, and the word processing features have been improved. This is first in a series of four articles introducing the editing features, starting with change bars. From there we’ll move on to the compare document utility, track changes, importing PDF comments.
A frequent request from my Adobe FrameMaker students is how to indicate were changes have been made to a document. We have a few options, but let’s start with a look at change bars.
Here’s how automatic change bars work:
- Open a FrameMaker document.
- Choose Format > Document > Change Bars.
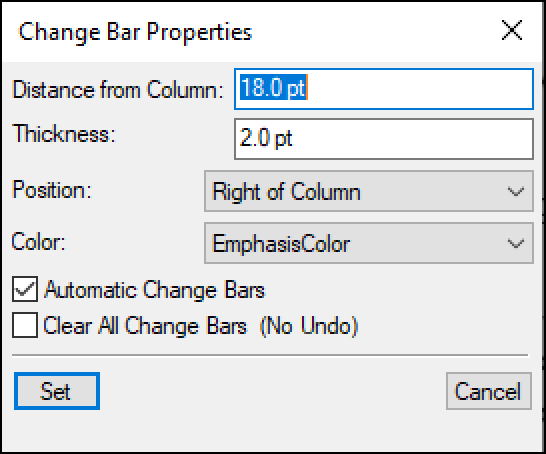
- Decide how you want the bars to look (distance, thickness, position and color). Don’t forget to enable the Automatic Change Bars checkbox before you click Set.
- Start typing and editing. The bars will appear automatically next to any line that you change.

- When you decide that you are ready to remove the change bars, simply return to Format > Document > Change Bars and enable the Clear All Change Bars (No Undo) checkbox. Click on Set and they will be permanently removed.
Note: You can also enable Change Bars as a paragraph style attribute (Paragraph Designer > Font > Change Bars) and/or as a character style attribute (Character Designer > Change Bars). The Clear All Change Bars (No Undo) will remove these as well.
But what do you do when you make edits before you remember to turn on the change bars? In that scenario, the Compare Documents utility will be just the thing.
Related posts
Adobe FrameMaker: Compare Documents (Part II in the Editing Series)
Adobe FrameMaker: Track Text Edits (Part III in the Editing Series)
Adobe FrameMaker: Importing PDF Comments (Part IV in the Editing Series)
Thanks a lot for your help !!