Need training at your office? Request a quote for custom training.
Adobe InDesign: Rebuilding Preferences and Cache Files
by Barb Binder, Adobe Certified Instructor on InDesign
updated: Mar 26, 2024
When InDesign suddenly starts behaving erratically, it may be due to corrupt preference or cache files. Closing InDesign, deleting (or renaming) these files and reopening InDesign will force InDesign to recreate a fresh copies. This resets InDesign back to a default installation. It is more effective than uninstalling/reinstalling InDesign (which leaves the problem files behind) and is quicker than completely removing InDesign using the Adobe CC Cleaner tool.
Rebuilding preferences to solve quirky InDesign behavior
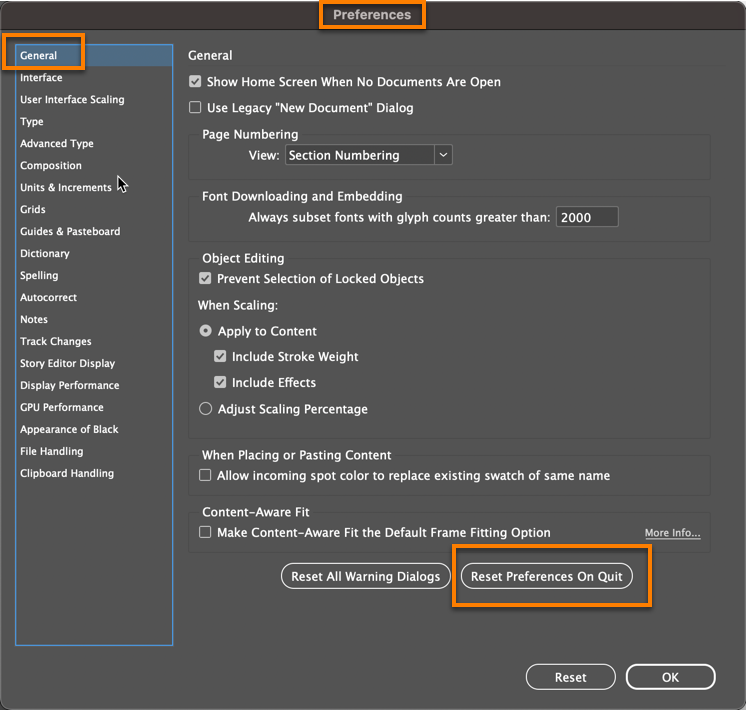
1. New in InDesign 19.3!
The keyboard shortcut on launch technique explained in the next section works for all versions, but is difficult for some to accomplish because of the precise timing required. InDesign 19.3 has introduced a new feature that will allow you to reset preferences from within the program.
- Save and close all open files.
- Open Edit > Preferences > General (Windows) or InDesign > Preferences > General (Mac.)
- Click Reset Preferences on Quit. Close and then restart InDesign.
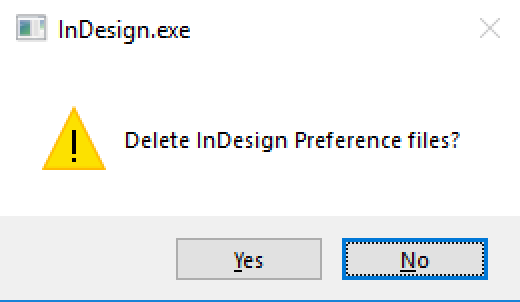
2. Keyboard shortcut on launch (use on 19.2 and earlier versions of InDesign)
- (Windows) Start InDesign, and then immediately press Shift+Ctrl+Alt. Click Yes when asked if you want to delete preference files. If you don’t see this message, either try again (it’s a timing thing) or move on to manually removing the files.

- (Mac OS) Start InDesign, and then immediately press Shift+Option+Command+Control. Click Yes when asked if you want to delete preference files. If you don’t see this message, either try again (it’s a timing thing) or move on to manually removing the files.

3. Manually removing (or renaming) the files
Delete (or rename) the InDesign SavedData and InDesign Defaults files. Renaming allows you to restore the old files if this doesn’t fix the problem.
Close Adobe InDesign.
- Mac OS
Users/[user]/Library/Caches/Adobe InDesign/Version [version]/InDesign SavedData
Users/[user]/Library/Preferences/Adobe InDesign/Version [version]/InDesign Defaults - Windows 10
Users\[username]\AppData\Local\Adobe\InDesign\Version [version]\[language]\Caches\InDesign SavedData
Users\[username]\AppData\Roaming\Adobe\InDesign\Version [version]\[language]\InDesign Defaults
Restart InDesign.
Rebuilding the cache files if the above steps don’t solve the problem
If the problem persists, on to rebuilding the cache folders. To avoid frustration, please read the notes before you start.
Windows:
- Close InDesign
- Rename both InDesign folders:
- C:\Users\user\AppData\Roaming\Adobe\InDesign
- C:\Users\user\AppData\Local\Adobe\InDesign
- Restart InDesign
Note 1: These folders may be hidden in Windows. Use Control Panel > Folder Options (or File Explorer Options) and then click the View tab. Enable Advanced > Show hidden files and folders (or Show hidden files, folders or drive options).
Note 2: Renaming the InDesign folders will remove saved Find/change queries, saved workspaces, etc. Once you establish that the software is working as expected, you can move those folders from the renamed InDesign folder into the new one.
Mac:
- Close InDesign
- Rename the following file and folder:
- ~/Library/Caches/com.adobe.indesign
- ~/Library/Preferences/Adobe InDesign
- Restart InDesign
Note 1: The Library folder is hidden by default. Open a Finder window. Hold the Opt key and open the Go menu. When the Option key is held down, Library will appear in the menu between Home and Computer. Now you can navigate to Caches and then to Preferences. (New in Mojave: press Cmd+Sh+. to show hidden files and folders.)
Note 2: Renaming the InDesign folder will remove saved Find/change queries, saved workspaces, etc. Once you establish that the software is working as expected, you can move those folders from the renamed InDesign folder into the new one.
Hi, I’m a little confused. What do I rename the folder as? Do I make a copy of the folder beforehand?
I’m so stressed my indesign won’t work at all please help
Mia:
You can delete the two folders (permanent) or you can drag the folders to your desktop (forcing InDesign to rebuild them) or you can append the word “old” to the end of each (forcing InDesign to rebuild them).
If it works, great. If it doesn’t make a difference, you can drag the folders back to their original locations or you can remove the word “old” from the end and return to where you are now.
~Barb
Phew. This was so helpful. Thank you so much. I’m more than grateful. I had to delete both folders tbh, didn’t care for any workspace.
Thank you Barb.
Wow it really worked, Thanks
Thank you very much for sharing this. It solved an issue for me where Undo was not working after an update.
Thank you for your post, It helped me.
In my case, my indesign screen was black and I could not turn off the GPU performance in the preferences on Mac, the panel would disappear just before I could uncheck the box lol, a frustrating bug but very funny haha.
In any case, I followed the above steps, then I could uncheck the GPU performance box and open the file.
Thanks again!
Hi!
Unfortunately, I can’t apply any of the recommendations.
I don’t have the reset preference option on my preference panel.
I don’t have the InDesign folder on my cache files.
Please help!!!!
Hi Patty:
As per the blog post, the option to reset preferences from within InDesign is only in version 19.3 or later. If you are on an earlier version, it is not included. You will need to update InDesign to see it in Preferences.
All versions of InDesign have an InDesign folder, however they are hidden by default. Please see Note 1 under both the Mac and Windows instructions on how to disable this operating system default.
~Barb
Does this also work with Illustrator? or is there a special process for Illustrator?
In Illustrator, use Preferences > General > Reset Preferences.
See also, https://helpx.adobe.com/illustrator/using/setting-preferences.html
~Barb
Renaming the cache file helped, thank you!