Need training at your office? Request a quote for custom training.
Adobe InDesign: Custom Underlines
by Barb Binder, Adobe Certified Instructor on InDesign
Updated: May 24, 2020
Underlines are one of things that can identify you as new to design and layout. Originally a proofreader’s mark for italics, underlines took on a life of their own during the typewriter years, when they were one of the only ways one could emphasize text. In professionally typeset documents, you are very unlikely to see underlines used for emphasis; instead you might see italics, a weight change, a color change or some combination of the above. In a nutshell, you really don’t want to use underlines in your printed documentation as a form of emphasis.
Ok, so why, you must be wondering, is this the first of two blog posts devoted to underlining in InDesign? The answer is that because custom underlines can do some pretty cool things that go way beyond solid black lines that underscore text.
- Open up a document with some sample text to play with.
- Select a couple of random words, and apply underlining by clicking on the Underline button on the Control Panel.


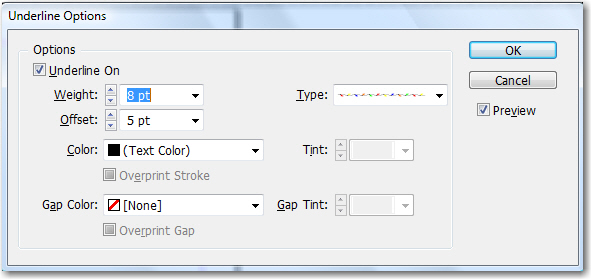
- It’s not very attractive is it? It’s pretty darn easy to customize the underlines though, so that they transition from boring to fun. Start by reselecting one of the underlined words, and then hold the Alt/Opt key on the keyboard as you click on the Underline button again in the Control panel. Look at that! A dialog box opens up, with underline controls:

- Turn on the Preview button and then play with the Weight, Offset and Text Color options. It gets better when you pick a more interesting underline like Wavy.

- Still not exciting enough? How about if you try out the Easter Egg rules we added in Adobe InDesign: Creating New Stroke Styles?

A final thought. You may love the lights or the waves, but your boss might not. You can save the underline as a character style, and if you get the kibosh on the lights, you can always just double click the character style, navigate to the Underline Options and try something more restrained, like, uh…Feet!


I have tried to bring up the underline options dialog shown above, but no amount of alt/clicking seems to bring up the option. I’ve got Frame 9. Any help would be most appreciated!
Hi David:
This is an InDesign post… sadly, there’s no equivalent feature in FrameMaker 9.
~Barb
How embarrassing! Thanks!
Let me just add that I wish we had that feature in FrameMaker, David!
I was so psyched when I first read the article. The underline in Frame is so incredibly close to the letters. We occasionally have to put full URLs in our materials. The underlines are so close that underscores in the URL appear under the underline. It’s a decidedly odd look.
underline options are not coming when i am using this alt method in adobe CS6. I want to set offset property in underline text. any help
I just opened up a copy of InDesign CS6, and it works as described in the blog post. I also tested it in InDesign CC 2015, and it still works as described. On a Windows computer, start by reselecting one of the underlined words, and then hold the Alt key on the keyboard as you click on the Underline button on the Control panel. On a Mac, hold down the Option key on the keyboard and click on the underline button.
Barb, I just want you to know how much I appreciate your blogs on InDesign. Very helpful for someone who has had to learn by a DVD. Just read your lines blog and was brought over here. Simple stuff! Thanks a million.