Need training at your office? Request a quote for custom training.
Adobe InDesign: Adding Bookmarks for Adobe Acrobat
by Barb Binder
Sure, you can add bookmarks in Adobe Acrobat, but should you? Nope, not in my opinion. I teach how to add and edit bookmarks in my Adobe Acrobat classes, but I also take the time to make sure that my Word users know how to create bookmarks from styles using PDFMaker in Word, that my FrameMaker users know how to create bookmarks from styles in FrameMaker (for details see “Adobe FrameMaker: Defining Bookmarks”) and that my InDesign users know how create their bookmarks in InDesign.
Why not just wait until you get to Acrobat? I’ve learned that we should do everything thing possible in the source files before we create a PDF, so that when we need to update the PDF down the road, it’s no big deal. When we start using Acrobat’s enhancement features (like adding links, bookmarks, movies, etc.) in Acrobat, we end up having to recreate them after major updates to the source file force us to regenerate the PDF.
So, back to InDesign. Unlike Word and FrameMaker, both of whom base their bookmarks directly on paragraph styles, InDesign generates bookmarks based on a table of contents (TOC), which is, in turn, based on styles. The difference is that if you don’t generate a table of contents, even if you don’t want to actually use it, you won’t be able to make your headings into automatic bookmarks. Here’s how it works: (If you are already using a TOC in your document or book, skip on to step 4. Otherwise, start with step one.)
- Add a page for the TOC. (Normally, the TOC is at the beginning of a publication, but if you are only generating it for the purpose of creating Acrobat bookmarks, add a blank page to the end of your document.)
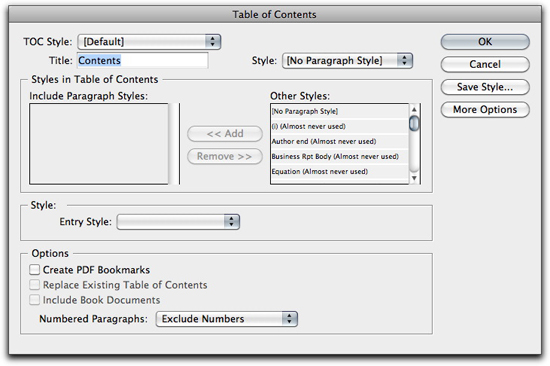
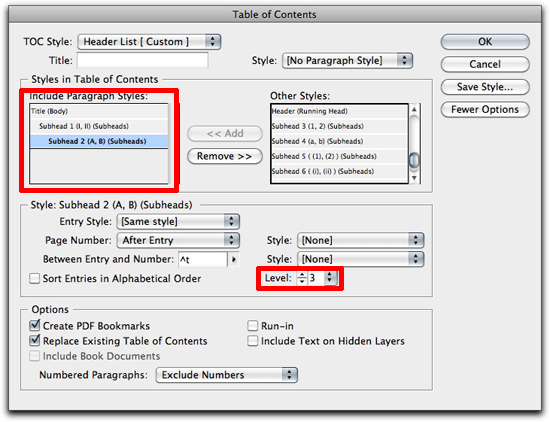
- Create the TOC with Layout > Table of Contents.

- Add the styles that you wish to make into bookmarks to the list on the left. In my example, I want to include the Titles, the Subhead 1s and the Subhead 2s.

- Turn on Create PDF Bookmarks. (For those of you with an existing TOC, you just need to come back in here to make sure that the Create PDF Bookmarks is on. Use Layout > Create Table of Contents.)

- Click OK and the place the TOC. (For the purpose of this blog post, I’m assuming you simply want to create a TOC as a means of automatically creating Bookmarks. In that case, you can place the TOC on the back page and leave it unformatted.)
- Save your file.
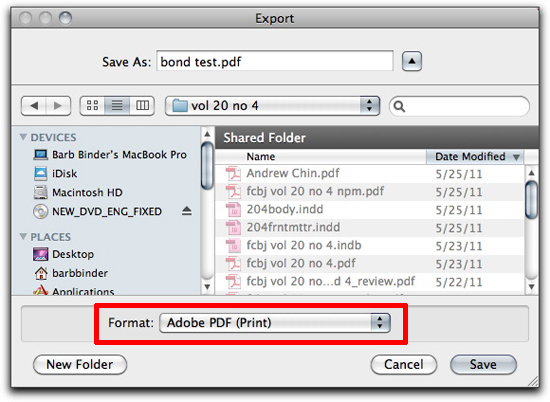
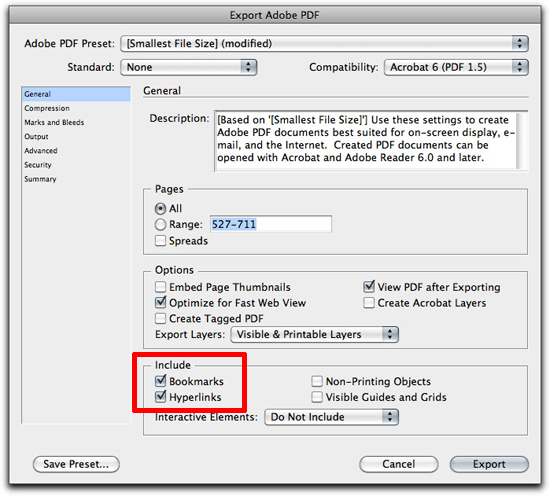
- To create a PDF, choose File > Export. Give your file a name, and choose Format > Adobe PDF (Print) from the bottom of the dialog box.

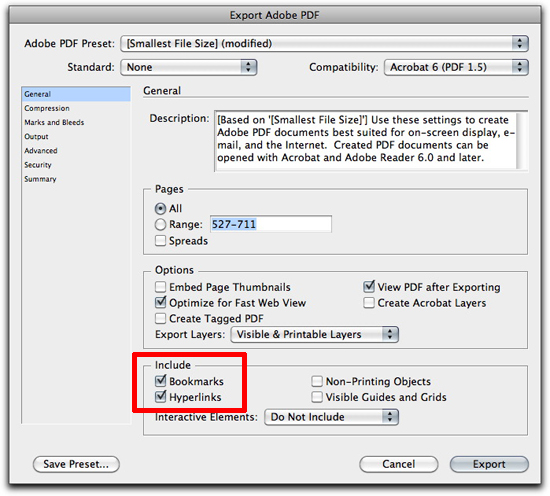
- Choose the appropriate settings for your document. I’d suggest activating View PDF after Exporting, and please don’t forget to Include Bookmarks. If you created the TOC on the last page simply because you wanted to generate Bookmarks, remove the last page from the Page Range. Click on Export to create the PDF.

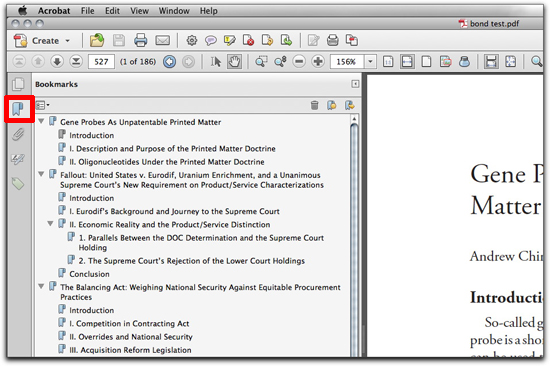
- If you don’t see the bookmarks automatically in Acrobat, just click the little blue ribbon in the navigation bar, and there you go!

Here are a few more things to consider:
- If you want to control the bookmark hierarchy, return to Layout > Table of Contents. Choose More Options to expand the dialog box. Now you can select each paragraph style from the Include column and set the level. The increased indent levels will translate to nested bookmarks in Acrobat (as shown in the image above).

- If you want to have a traditional TOC and then generate a different TOC for the bookmarks, you can do it. Just use the Save Style Option to save both of them as individual TOCs.
- Here’s the best part: sometimes you may want to bookmark items that are not headings. Perhaps it’s a figure, or a table, or just some text within a larger section. InDesign is the only program of the big three (InDesign, Word, FrameMaker) that allows you to add manual bookmarks exactly where you need them. Open Window > Interactive > Bookmarks. Make a selection and choose Create New Bookmark from the Bookmarks panel menu. Manual bookmarks show up with an anchor symbol along with the generated bookmarks. If you are using manual bookmarks, make sure you remember to turn on Include Bookmarks and Hyperlinks when you export.



Thanks for the tip, you saved me a lot of time!
Even better than adding the TOC to a end page: add it to an existing page on a non printing layer. Your bookmarks will still export.