Need training at your office? Request a quote for custom training.
Adobe FrameMaker: Object Styles
by Barb Binder, Adobe Certified Instructor on FrameMaker
Updated: May 16, 2018
If you haven’t had the chance to explore FrameMaker’s object styles, then you are missing a terrific productivity tool. Experienced FrameMaker users learn to rely heavily on paragraph, character and table styles. Really, what would we do without them?
The benefit of styles in general:
- one click application of multiple formatting commands;
- consistent treatment of an object throughout a project; and
- easy updating across an entire project.
I am thrilled to have object styles added to our style repertoire, beginning in Adobe FrameMaker 11. Here’s how Adobe introduces them in their online Help:
You can save your frequently used object properties as a style. You can apply these object styles to various objects, such as images, anchored frames, and text frames for consistent size and appearance. For example, you can create and apply an object style to all the anchored frames in a document, or across documents, to make them of the same size.
Ready to give it a shot? Here’s an example of how to use an object style on an inline anchored frame.
Creating an object style
- Click an insertion point in a paragraph.
- Choose File > Import > File and select an image to play with.
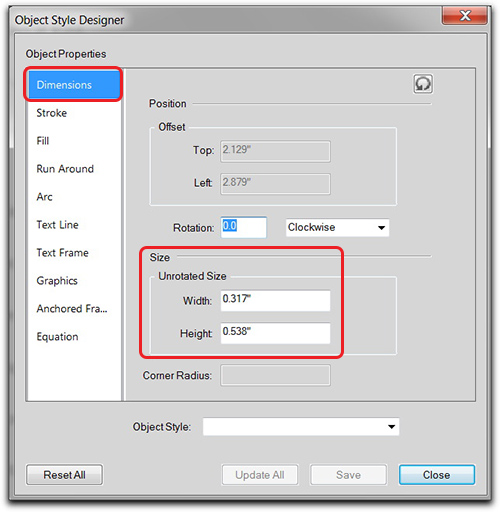
- Take a minute to format the frame as desired. In my example, I used Esc m p to shrinkwrap the frame to the image of the ant, and to anchor the frame at the insertion point. I also moved the frame down to better align the image with the text.

- With the anchored frame still selected, choose Graphic > Object Style Designer.
- Click your way down the left column to see the possibilities.

Note: Not all properties can be used on all objects. For example, an arc can’t have columns defined. A text frame can’t have an arc’s start and end angles. Inappropriate commands aren’t dimmed, but if you attempt to pick one, it doesn’t do anything. - Take particular note of the Dimensions and Anchored Frame properties, both of which reflect the properties of our selected frame.

- Enter an object style name. I called mine InlineIcons. Click Save. Click Close.
- Assign the new object style via Graphics > Object Catalog.
- A quick glance at the Status Bar shows the object style assigned to the selected frame.

- With the anchored frame still selected, choose Edit > Copy.
- Paste the frame a few times.

Looks great, except they are all a little too low. Good thing we have an object style. Let’s edit the style and see if we can get them all to update.
Editing an object style
- With the anchored frame still selected, choose Graphic > Object Style Designer.
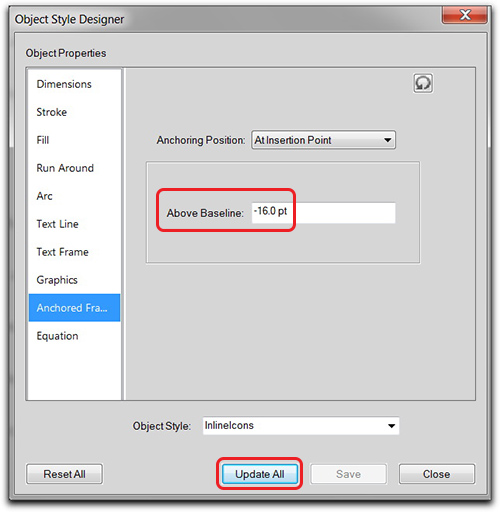
- Click on Anchored Frame properties in the left column.

- Modify the frame properties. In my example, I adjusted the distance Above Baseline to better center the ants along the text. Click Update All, then click Close to see the impact on all the frames using the object style.

- Much better! Now all I need to do is change out a few of the images, and voila…the finished poem. (And yes, I’m aware that’s a fly and not a flea. Can we call it poetic license?)

First observations on object styles in FrameMaker:
- The Object Style designer is a dialog box, and not a panel. That means it will completely go away when you click on Close. You will not be able to dock it with the other Designers. (This persists through the current versions.)
- Use Graphic > Object Style Catalog to see a list of object styles in the current document. You can dock the catalog with the Paragraph, Character and Table catalogs, if you like.
- File > Import > Formats now offers the opportunity to import object styles into a file or book.
- Applying object styles:
• You can assign an object style to a selected object by clicking on the name in the Object Style catalog.
• You can apply an object style to an anchored frame from the list at the top of the Anchored Frames panel.
• You can apply an object style to an imported (bit-mapped) image by selecting the object style from the bottom of the Imported Graphic Scaling dialog box. - Not all properties listed in the Object Style designer can be used on a single object. For example, an arc can’t have columns defined. A text frame can’t have an arc’s start and end angles. Inappropriate commands aren’t dimmed, but if you attempt to define one, it doesn’t do anything.
- Some properties change in the document as soon as you click on Update All. Anchored Frame properties don’t update until you click Close.
- Keyboard shortcuts for object styles:
• Esc g i opens the Object Style designer.
• Esc g e opens the Object Style catalog.


I inserted all my images into frames in FrameMaker. However, my original images had no borders and our documentation requires borders around images. So, here is what I did – and it did not work:
1) I selected my first image in the file and I created an object style called “ImageBorder” with a 1 pt. black border (I set those parameters for the “Stroke”).
2) Next, I applied the ImageBorder object style to the next few images in my FrameMaker document.
3) Unfortunately, the object style retained the dimensions of the original image used to create the object style. That meant that that no matter the size of image to which I applied the object style, the image was reduced to the size of that first image.
4) Next, I tried editing the Dimensions of the object style and removed the Height and Width values.
5) However, when I applied the updated object style to my images, the images became gigantic and pixelated.
There must be a way to put a border around ALL the images in my FrameMaker document, but I cannot figure it out, and none of the information I managed to find on the Web helps.
Can you help me?
Martha (from Fort Collins, CO)
Hi Martha:
“1) I selected my first image in the file…” did you mean frame? You will want to create the object style for the anchored frame and not the image inside.
~Barb