Need training at your office? Request a quote for custom training.
Adobe FrameMaker: How to Create a Mini-TOC for Individual Chapters
by Barb Binder, Adobe Certified Instructor on FrameMaker
Updated on Jan 10, 2018
Note: This post refers to a manual Mini-TOC. Beginning in FrameMaker 2015, Adobe added an automatic mini-TOC feature which is significantly easier to work with. For more information on the new Mini-TOC, see Adobe FrameMaker Online Help.
Most advanced FrameMaker users know how to create a Table of Contents (TOC) for their books, but many don’t know that FrameMaker can also generate a mini-TOC for each chapter. Adding chapter-specific TOCs can be a useful way to navigate to the correct section for those crazy-long books that makes FrameMaker so valuable.
Let’s say that you already have put together your book, along with the traditional TOC in the front matter. Everything is working properly, and you can update your book, and the TOC, without any problems. Then you decide that you want to add a mini-TOC in front of each individual chapter. Here’s how:
- Open up the first chapter in the book.
- Select Special > Add Table of Contents.

- Choose Yes to create a standalone Table of Contents for this document.
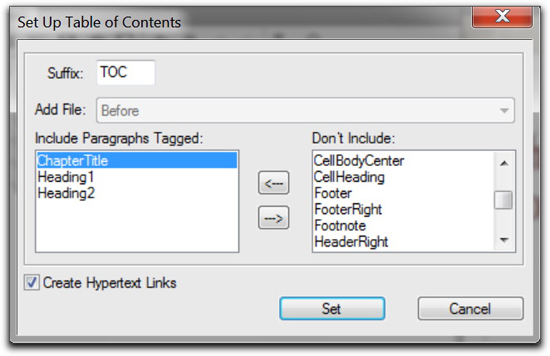
- Select the paragraph formats you want to pull into the TOC from the source file. In my example, I’m including the ChapterTitle, the Heading1s and the Heading2s. Click Set.

- FrameMaker creates a brand-new file with the mini-TOC. If this is your first mini-TOC, you will need to take some time to format it. This includes setting up the generated paragraph formats and refining the structure on the reference pages.
- Once the file looks the way you want, save it and add it to your book file.
Now, here’s the (unpleasant) surprise on updating the mini-TOCs after document edits have been completed. The mini-TOCs will update their page numbers with a book update, but not their contents. In order to update the contents of the mini-TOC, you will need to return the source file and choose Special > Table of Contents. Choose Yes to create a standalone Table of Contents for this document. It feels like you are starting over, but instead, this time the command simply updates the data in the TOC. As long as your formats are set up correctly in the Paragraph Designer and on the reference pages, your mini-TOC will update to reflect the most recent edits and still look beautiful.
On my wish list: I wish that FrameMaker could somehow update all the chapter TOCs during a book update. In the meantime, I simply need to remember to update the mini-TOC manually, after completing the editing on that chapter.

