Need training at your office? Request a quote for custom training.
Adobe FrameMaker 10: Adding Object Attributes to Images
by Barb Binder
These days, all of our PDF documents really should be 508 compliant. This includes adding text descriptions to images so that someone using a screen reader to accommodate a visual disability can hear a description of what an image contains. These descriptions can be added in Acrobat (Standard or Professional) via View > Tools > Accessibility, but it would be better to enter them into the FrameMaker source files. That way, if you ever have to recreate the PDF, you won’t wipe out all of your hard work.
Here’s how:
- Open a FrameMaker 9/10 document.
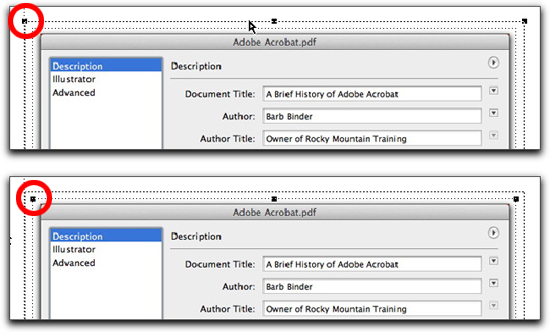
- Select the first anchored frame that contains an image. It’s important that you have the frame selected, and not the image inside the frame. In the picture below, note the two sets of dotted line rectangles. The outer rectangle is the frame, the inner rectangle is the image.

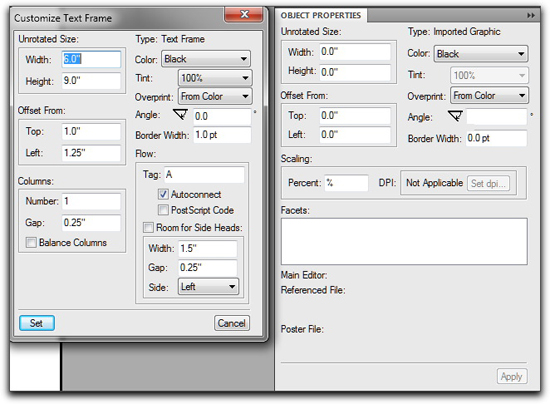
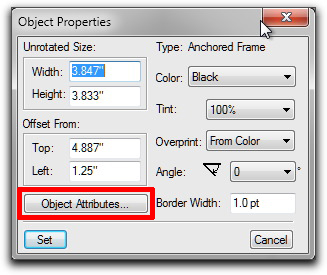
- Choose Graphics > Object Properties. It’s important that you open the Object Properties dialog box and not the Object Properties panel, which may be visible on the right side of your screen. See Observation of Object Properties for a more detailed explanation.
- Click the Object Attribute button. (It won’t be available if you are in the panel, see step 3 above.)

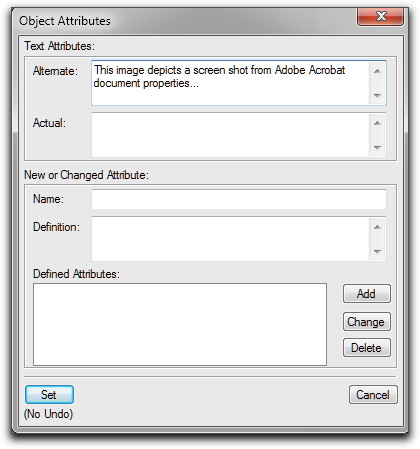
- Enter your attributes (see Elaboration on Object Attributes for details), and click both Set buttons when you are done to return to your document. (Don’t stress about the No Undo warning. If you make a mistake, just reopen the dialog box and fix it.)

- Repeat steps 2–5 for your remaining anchored frames.
- Save your file.
- Choose File > Save as PDF and be sure to enable the Tagged PDF in the PDF Setup dialog box.

Observation of Object Properties
In my opinion, Object Properties in FrameMaker 9/10 is a bit confusing. When you have an image selected and you choose Graphics > Object Properties, a docked panel opens, but when you have a FrameMaker object selected (anchored frame or a shape drawn with one of the drawing tools in the toolbox) and you choose the exact same command, a dialog box opens. While they look similar, they are not interchangeable. I see my FrameMaker students getting into trouble when they select a FrameMaker object, and then try to manipulate it by changing values in the panel. It doesn’t work. Until you know exactly which one you need, I recommend selecting an object and then open the correct interface via Graphics > Object Properties. FrameMaker knows exactly which one to open, even if you don’t.

Elaboration on Object Attributes
When you are adding text attributes for a tagged PDF, you will need to decide between Alternate Text and Actual Text.
- Alternate Text is typically used for describing an image to someone who can’t see it. A typical Alternate Text description begins with “This image depicts…” and then goes on to describe the image in detail. A screen reader can read the description out loud to someone with a visual disability.
- Actual Text is for reading aloud the actual text, as in the case of a drop cap. For example, if I am using a drop cap for the letter R in the term “Rocky Mountain Training” but still want the screen reader to read the first word as “Rocky” and not as “ocky,” I can fill in the actual text.
NOTE: The Actual Text attribute is processed only for tagged PDFs. If you are reading this post to learn how to add descriptions to your tagged XML files, please note that XML export ignores the Actual Text attribute.


Barb,
The technique you describe works great in FM10 for graphics in the body of a document. I’m finding that Object Attributes are not available to me when working on master pages. How does one add alternative text to graphics on a master page (such as when you have graphics as part of your header or footer, like we did in class)?
Hi David: Here’s the problem: the object attributes are only available for anchored frames. When you add images to a master page, you typically put them directly on the page and don’t have them in an anchored frame. You should be able to anchor the images to the text in the header or footer box (review Lesson 9 for anchored frame positions), which will allow you to access the feature.
~Barb