Need training at your office? Request a quote for custom training.
Adobe InDesign: Using Story Editor
by Barb Binder
If you are like a lot of my self-taught intermediate-level InDesign students, you’ve successfully avoided Story Editor. Not on purpose, of course, but if you ever opened it up, I bet you were first startled by the new view of your document, and then greatly relieved when you figured out how to close the window without disrupting your layout. Let’s take a few minutes to figure out why you might to open it, on purpose!
The idea behind Story Editor is to show you a “word processing” view of your text files. Back in PageMaker’s heyday, it was the only way to see the non-printing characters, and that alone made it worth opening. These days, Track Changes may force you to open it up, but personally I use it for other things as well. Here’s how to get started:
- Open up a document with linked text boxes. You may not have realized it, but you are looking the file in Layout view. Now picture having to enter edits into a multi-page, multi-column document. A lot of time is wasted zooming, panning and changing pages. Let’s switch to Story Editor view.
- Select the Type tool, and click your insertion point in a paragraph:

- Edit > Edit in Story Editor. (This command is a toggle. Once you are in Story Editor view, the command will show Edit in Layout View. Pressing Cmd Y a few times (Ctrl Y on Windows) will take you back and forth between the two views.)

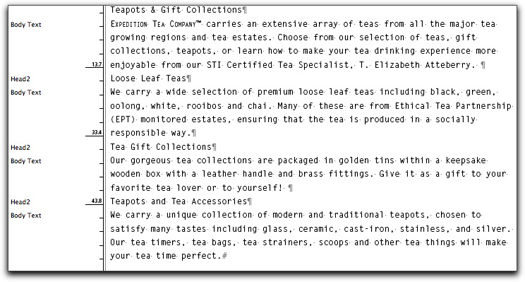
You are now looking at the same story, but in Story Editor view. You are no longer able to see the line breaks, column breaks, or anything else you might find distracting in Layout view. The trick here is to remember that you are simply experiencing another view of the same file. Any changes you make here will appear in Story Editor view. I like this view for the following reasons:
- I don’t have to scroll up and down, and change pages as I enter edits into my InDesign document.
- I can quickly see the applied styles in the list at the left. In some of my layouts, it’s easier to proof the styles by name, because they look so similar in the Layout view.
- If I’m using Track Changes, it’s the only way to see what has been modified, and to accept and reject changes one at a time.
- My eyes are slowly deteriorating. Story Editor allows us to customize the display to make it as comfortable to read as possible.
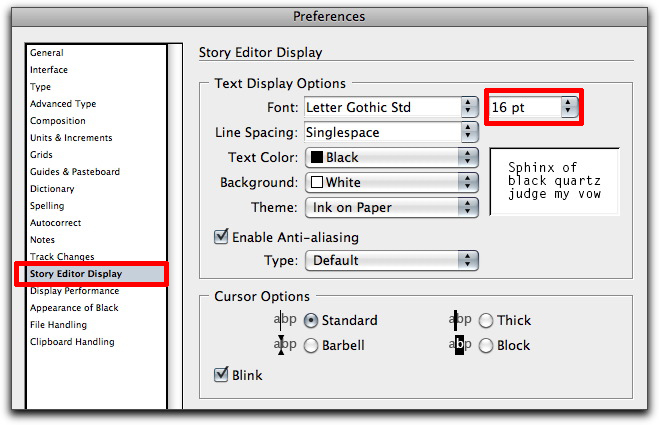
To see the Story Editor options, choose InDesign > Preferences > Story Editor Display (on Windows it’s Edit > Preferences > Story Editor Display). These settings will only impact the Story Editor view, and will have no effect on the Layout view:

I normally make the text big enough to see comfortably, and to open up the line spacing. No reason you can’t have fun, though. There are options for setting the font, the cursor and the foreground and background colors. If you want to take a walk down memory lane, try out some of themes shown below:

Amber monochrome, Classic System, Terminal and a custom crazy combination I picked. (Just confirming that you want to hire me as a trainer and not as a designer!)
Once you’ve customized the Story Editor view to match your specific preferences, just sit back, relax and enter in those edits that should have been included in the draft you laid out marked “final”. Let me know if it helps!


Barb, Is there a way to export this file and have an external person work on editing the document, then re-connect it with the same ID file (with all the formatting still in-tact)?
Hi Beth:
Adobe has a product called InCopy that offers that scenario. It’s inexpensive and easy to use. Basically, the designer uses InDesign for layout, and creates “assignments” (could be a story, a spread, etc.) and makes them available to the InCopy user. The InCopy user is able to check out the assignment, work on it, and then check it back when they are done. It’s pretty cool. You can download a free 30-day trial from adobe.com and give it a try.
~Barb
Dear Barb Binder,
Thank you.
Reading 12 point text in US Standard page size in Layout was fine, but my aged eyes were struggling with it in Story view.
I had just assumed if I changed the size it would change in Layout also, you said not so, so I tried it. I now have my Layout in 12 point but my Story editor in 16 point. Thanks for the tip.