Need training at your office? Request a quote for custom training.
Adobe InDesign CS5, CS6 & CC: Rounded Corners
by Barb Binder
Back in the day, if you wanted a frame with just one or two rounded corners in Adobe InDesign, you either had to be pretty darn good with the Pen tool or you poked around the obscure Scripts panel long enough to locate the CornerEffects script in the Applications folder. Anyone on CS4 or earlier, stop reading now and go find the script. Folks on CS5 and later, continue reading. You are going to love this!
- Select any frame (text, graphic or unassigned) with the Selection tool.
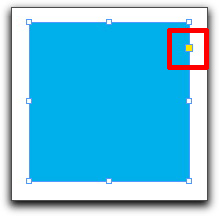
- In CS5 & later, you will see the eight standard sizing handles that you have come to know and love, along with a yellow handle, just under the top right corner. (If you don’t see it, choose View > Extras > Show Live Corners.)

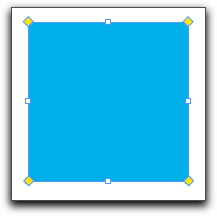
- When you hover over the yellow square, you will see a tooltip stating “Click to edit corners.” Don’t be shy: click it! The four corner handles change to yellow diamonds.

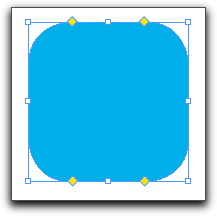
- Drag any one of the diamonds in towards the middle of the frame and all four corners are rounded simultaneously.

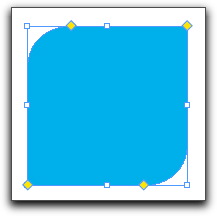
- Now for the fun: hold the Shift key and drag one of the corners back out. Repeat for another corner and you are good to go. Pretty painless!

Too excited to stop playing? Click the diamond one more time, and then try Option clicking (Windows: Alt clicking) on one of the diamonds. Keep clicking until you cycle through all the options. Oh, the possibilities.


would there be a reason extras would not be in my view tab? Im special thanks for the help 🙂
Hi Sunshine Runner: It is possible to remove a command from any of the menus in Adobe InDesign. If you go to Edit > Menus and set the Category to Application Menus, you can use the little eyeballs in the Visibility menu to turn individual commands on and off. This can’t happen by accident, though. Did you upset a co-worker? 😉
“yellow handle” not appearing in my laptop in CS5. I cant apply the rounded efffects.
Would appreciate if you can help me to solve the issue on how that yellow small square thing to appear after doing the ctl+a.
Thank you in advance.
Hi Jun:
Try this: select the edge of the frame with the Selection tool (the black arrow). If you still don’t see the little yellow square, go to View > Extras > Show Live Corners.
~Barb
Barb,
I did,but i only have View, Extras. After that I dont have “Show Live Corners” menu. Maybe I was doin it incorrectly but I really cant find a way to let that yellow square appear on the screen.
Thank you for your prompt reply. Appreciate it really!
If you have CS5 or CS5.5 installed on your laptop, the Show Live Corners should be available the Extras submenu. If you have the right version and it really isn’t there, you might need to reinstall the software. In the meantime, you can get the same results using Object > Corner Options.
~Barb
I will re-install it and will try the Object-Corner Options.
Again, Maraming Salamat! (Thank you so much!)
Hi!
On the same page, I have frames that show the little yellow box to change the corners and frames that don’t show the little yellow box to change the corners. Any ideas what I did or can do to make them all viewable?
The only option I have on the above mentioned is “Hide Live Corners”.
Thanks!
Hi Beth:
Only rectangular frames can show the yellow square, and only when selected with the Selection tool (the black arrow). If some of your frames are showing the yellow square, then you have successfully activated View > Extras > Show Live Corners command. Now you need to make sure that:
~Barb
Beth and Jun, I had the same issue (only some frames showed the yellow handles) and it was because the ones without them were actually ‘Rounded Rectangles’ instead of ‘Rectangles’. Change them back to ‘Rectangles’ via Object > Convert Shape > Rectangle
Ahh this is awesome! exactly what I wanted to do!!!
This was really helpful! Will be bookmarking your blog!
Thank you so much for posting such kind of helpful tips. It fully worked for me in CS6.
Hi, I am using CS6. I am able to complete the steps above until you get to the Alt click selection. Using Alt or Crtl keys moves all four corners at the same time. Any suggestions would be appreciated.
Alex: It’s the Shift key to drag one corner at time to a new location (see step #5). The Alt/Opt key is used to change the corner style for all four corners. To change the style of just one corner, hold Shift + Alt and click. (Terminology reminder: the word “click” means “click the left mouse button and let go”. The word “drag” means “press the left mouse button—don’t let go—and push your mouse to a new location”.)
Hi every body…
thanks alot for help