Need training at your office? Request a quote for custom training.
Adobe FrameMaker: Custom Table Rules
By Barb Binder, Adobe Certified Instructor on FrameMaker
Updated: Jul 28, 2023
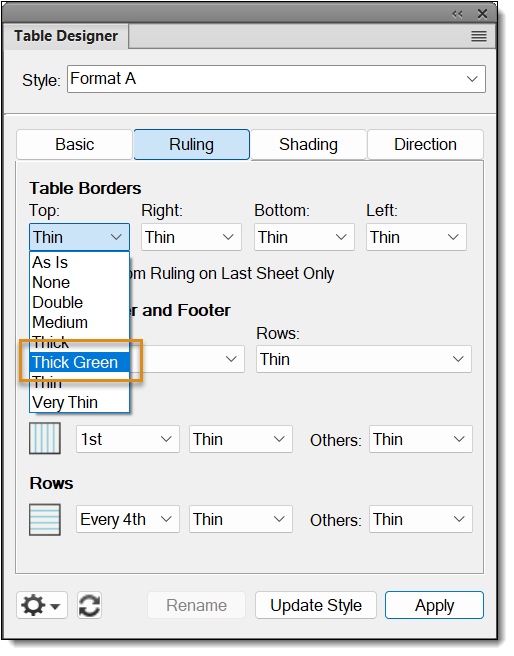
Ever wondered how to edit the rules listed in Table Designer? When you are designing a new table format, or refining an existing one, you need to make decisions about how the ruling lines should look in your tables. When you go to the Ruling properties of the Table Designer, you are presented with 10 lists of available ruling styles (all represented by the word “Thin” in the screen shot below).
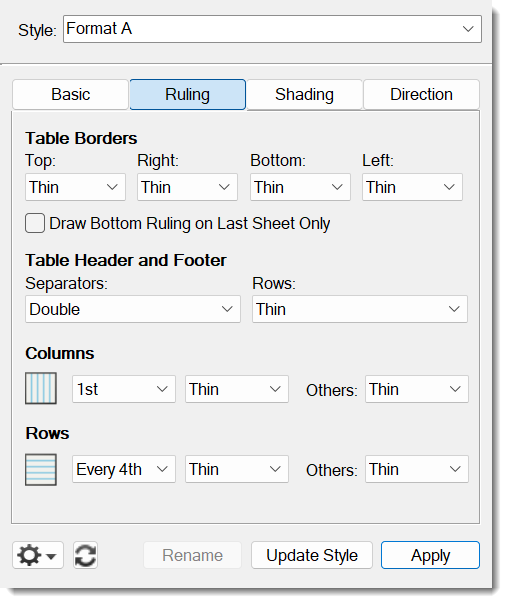
In a new, default document, each list looks like this:
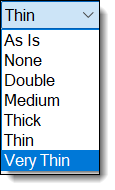
But what if you have other plans for your table rules? Let’s say you’d like a thicker line than Thick, or perhaps want to use any color other than the default black? Did you know that you can add/edit ruling styles through Custom Ruling & Shading? I didn’t think so. This is one of my regular polling questions in my FrameMaker classes, and most students simply stare blankly at me when I ask the question. Based on my many years in front of FrameMaker students, this particular feature is not one I’d label as “discoverable” (Adobe-speak for a feature you’ll easily find and figure out on your own).
Here’s how to modify the ruling line lists:
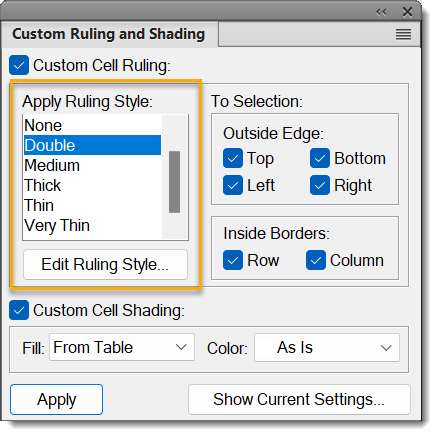
- Open Table > Custom Ruling & Shading

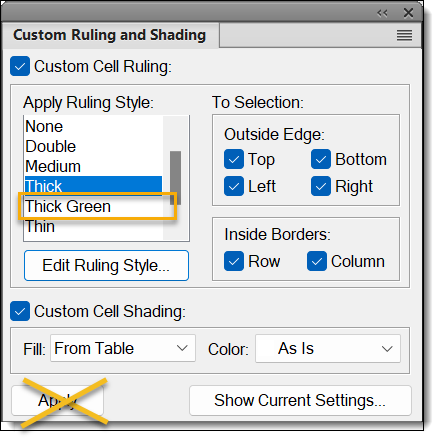
- Click on one of the ruling styles in the list (I picked “Thick”) and then click the Edit Ruling Style button. Now, what you do on the Name line will impact how the styles lists are modified:
- If you leave a default name you will update the existing style;
- If you type a new name, you will leave the default styles alone, and will be adding a new style to the list.
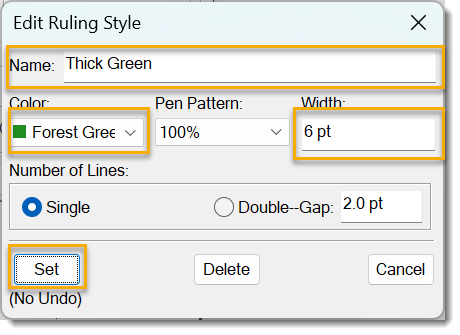
- In my example, I’m adding a new style called “Thick Green”. Pick the color, pattern, width (which means height), and whether you want a single or double line. I’m going with a 6 pt Forest Green rule.
- Click Set to add/modify the ruling style, but don’t click Apply! That would assign your new rule to whatever is selected in the table. Instead, just close or collapse the panel.
- Return to Ruling properties in the Table Designer and drop down any of the lists, and presto! Your new (or improved) ruling style is ready to go.
Hi,
This is very helpful, but I have a related issue that I wonder if you could help me with. My employer’s logo consists of a “T” that is in a triple line. I modified the line separating heading from body rows easy enough in MSWord, but I have found it very difficult in Frame. Currently, my ‘triple line’ consists of a tiny second heading row that is tweaked to create the appearance of a triple line. As you can imagine, this can be problematic. Is there any way that I can customize my tables to include a triple line?
Thanks in advance,
-David
Hi David:
Sadly, the Edit Ruling Style only supports singe and double lines. But, what if you were to create the triple rule in a graphic frame on the reference pages, and then attach it to the bottom of the CellHeadings? Wouldn’t that give you the look that you want? See What are Reference Pages? for basic reference page info, and More on Reference Pages for details on setting up a custom graphic.
Let me know if it works!
~Barb